Magical Unicorn Cake Cake Decorating Tutorial
Use this to Enchanted Unicorn Cupcake Decorating Tutorial create the cutest unicorn cupcakes anywhere. It’s perfect for birthday parties and the kids LOVED the meringue cookies.
Ingredients
Tools Needed (Items with a "*" are helpful but not required):
- 3 - 8" Cake Pans
- Cake Smoother
- Mini Offset Spatula
- *Speed Icer
- 16" Piping Bags
- Gel Colors
- Egyptian Gold Luster Dust
- Vodka
- Large Star Tips
- Parchment Paper
- 2 Large Cookie Sheets
- 8" Cake Board
- Serving Platter
- Cake Turn Table
- *Wilton Pan Spray
- *Cake Leveler
- Stand or Hand Mixer
- 1 box Gum Paste
- *2 Circle Cookie Cutters one smaller than the other
- Sprinkles
- Cake Dowels
- Small Paintbrush
- Rolling Pin
- Sewing Thread
Ingredients:
- 1 Recipe Perfect Vanilla Cake
- Double Recipe of Cotton Candy Meringue Cookies
- Double Recipe of Easy Italian Meringue Buttercream
Instructions
Instructions:
- Preparing the gum paste decorations ahead of time is very important. If you live in a dry climate, 24 hours ahead of time is great. If you live in a humid climate it's smart to allow the gum paste at least 48 hours to dry. For the unicorn's horn, use your hands to roll out a cone shape that is 6-8 inches long. You may need to dust your surface with a bit of powdered sugar to prevent sticking. When you are happy with the shape of the horn, insert a cake dowel into the widest end of the cone. You want half of the dowel in the horn and half of the dowel sticking out of the horn. The portion sticking out is how you are going to insert the horn into the cake. Take the thread and wrap it up from the bottom to the pointy end of the horn to create the line details. See picture below. The picture below is of a smaller horn for the Enchanted Unicorn Cupcakes (blog post coming soon) I made to go with this cake because I forgot to take a pic of me adding the line details to the big horn. #bloggerfail!
- For the unicorn's ears, I used a candy corn cookie cutter. I found it to be a similar shape to the one I wanted for the ears so it was very easy. If you don't have a large candy corn cutter you can draw the shape you want on a piece of paper and use it as a stencil. Roll out the gum paste on a surface dusted with powdered sugar until it's 1/4 - 1/8 inch thick. Place the ears on a large rolling pin or another rounded surface to dry.
- The eyes are super simple and quick. Roll the gum paste out in the same manner as for the ears. Use the larger circle cookie cutter to cut out 2 circles. Cut both circles in half. With the first 2 halves, use the smaller circle cutter to cut the rainbow shape for each eye. With the second 2 halves, we are going to make the lashes. See the picture below if you are confused by this portion of the instructions. With the flat edge of the circle half facing you, use either circle cutter to cut the lash shape out of the corner of each side of the half circle. Do the same to the other half circle and make each lash slightly smaller. If you don't have any of the cutters, don't worry. These are very basic shapes that can be cut out freehand with a scalpel knife. Use a little water to attach the lashes to the bottom, outside corners of the eyes.
- Once all the gum paste decorations are just about dry, mix a 1/2 tsp of the gold luster dust with a few drops of vodka. You can slowly add more vodka if necessary until you get a paint consistency. If you are painting and the gold isn't covering the gum paste, you added too much vodka. You have 2 options, you can either add more luster dust or wait for some of the vodka to evaporate. If your mixture is clumpy, you need to add a bit more vodka. Once you have the mixture correct all you need to do is use a small paintbrush and paint it onto the gum paste. For the ears just paint the inner section as pictured above for a cute little accent.
- Prepare the single recipe of Perfect Vanilla Cake according to the directions up until step 6. Once your pans are prepared, separate the cake batter into 3 bowls as equally as possible. Use your gel colors for the cakes and add them to the batter and mix by hand until the batter is completely one color. I used the color Electric Pink in the first bowl, Regal Purple in the second bowl, and Sky Blue & Electric Yellow in the third bowl to achieve the teal color. I used 3-4 drops of the blue and 1 drop of the yellow. When the batter in all the bowls is colored, transfer each color into its own prepared pan and bake according to the instructions.
- Allow the cakes to cool completely. Carefully run a spatula or knife around the cake to help it release. Use the cake leveler to make all of the cakes the same height. I like to measure the shortest cake and use that measurement to level the taller cakes. When you've finished leveling them, measure the cake height again and divide the measurement in half. Use the half measurement to cut each cake in half. I know this might seem a bit too perfectionist for some of you and that's okay. You don't have to do it this way but it makes for a great reveal when the cake is sliced and a more professional presentation. Wrap or cover the cakes and set aside.
- Prepare a double recipe of the Quick and Easy Italian Meringue Buttercream. I have a 6 - Quart Professional Series Kitchen Aid Stand Mixer. I have to make 1 recipe of this buttercream at a time because of its volume. If you have a bigger mixer, you are welcome to try to make them both at the same time. Place all of the buttercream in a bowl, cover with plastic wrap and let it set up for about 30 mins. This will make it much easier to use.
- It's time to assemble the cake! WOOHOO! I like to add a damp paper towel between my cake turntable and the cake board. It prevents the cake from slipping. To the cake board, add a small amount of buttercream to secure the first layer to the board. I alternated the colors of cake starting with teal, then purple, then pink and repeated this pattern to the top of the cake. In between each layer put a large dollop of buttercream and smooth it out as flat as possible. You want the buttercream to be about a 1/2 inch high between each layer. Once all the layers have been added you want to complete the crumb coat. Add a dollop of buttercream to the top of the cake and level it off. It shouldn't be thick. Crumb coating is used to seal the crumbs in the cake before the final ice. There should be enough buttercream over the edges of each layer to crumb coat the cake. Use your smoother to smooth the buttercream around the cake. Refrigerate for an hour to set the buttercream. Refrigeration allows you to be able to manipulate the buttercream without messing up your crumb coat. It also provides a smoother surface for the final buttercream layer.
- Insert your speed icing tip into your piping bag. Load the bag up with buttercream and pipe buttercream on the outside of the cake. Add a large dollop to the top of the cake and smooth that out flat first before smoothing the sides. Once the top is smooth, use your cake smoother to make the cake smooth and straight. To finish the final ice, use a small offset spatula to pull the excess buttercream onto the top of the cake. Don't worry too much about the smoothness of the top of the cake because it's going to get covered. It's only important to make sure it's level.
- Refrigerate at least 2 hours. While the cake is refrigerating, make the Cotton Candy Meringue Cookies according to the instructions. I split the meringue into 3 bowls and colored each bowl with the same colors as the cake batter but I did a lot less color for a more pastel look. Line 2 cookie sheets with parchment paper. Insert the large star tips into 3 piping bags. Load the bags with the colored meringue and pipe out rosettes and stars of different sizes. Making the meringues different sizes and shapes will add interest to the cake and make it more whimsical. Bake according to instructions and allow to cool.
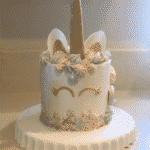
- Now that you have the cake iced, the gum paste painted and dry, and the meringue cookies, it's time to create your masterpiece. Mix the sprinkles in a bowl and use your hand to randomly add them to the bottom of the cake. Hold them in the palm of your hand and gently push them into the cake until you are happy with the result. Next, GENTLY add the eyes to wherever you want the front of the cake to be. Dry gum paste is very brittle so be very careful! Once you've added the eyes, insert the horn towards the front of the top of the cake at a slight forward angle. Place the ears on either side of the horn and again, GENTLY push them into the cake. The last step is to add the meringues to the top of the cake flowing down one side to represent the maine of the unicorn. You may need to add a spot of buttercream to the meringues that go on the side to ensure they stick. Sometimes the buttercream is too firm for the surface of the meringues to stick. Use a large offset spatula and your fingers to support the bottom of the cake to transfer it to your serving platter.
- You're done!!! Step back and enjoy your masterpiece.
Nutrition
Nutrition Facts
Magical Unicorn Cake Cake Decorating Tutorial
Amount Per Serving
Calories 1088
Calories from Fat 531
% Daily Value*
Fat 59g91%
Saturated Fat 37g231%
Cholesterol 211mg70%
Sodium 713mg31%
Potassium 163mg5%
Carbohydrates 130g43%
Fiber 2g8%
Sugar 111g123%
Protein 13g26%
* Percent Daily Values are based on a 2000 calorie diet.
Tried this recipe?Let us know how it was!