Use this decorating tutorial to create the most beautiful Hombre Meringue Cake for a birthday party or any special occasion.
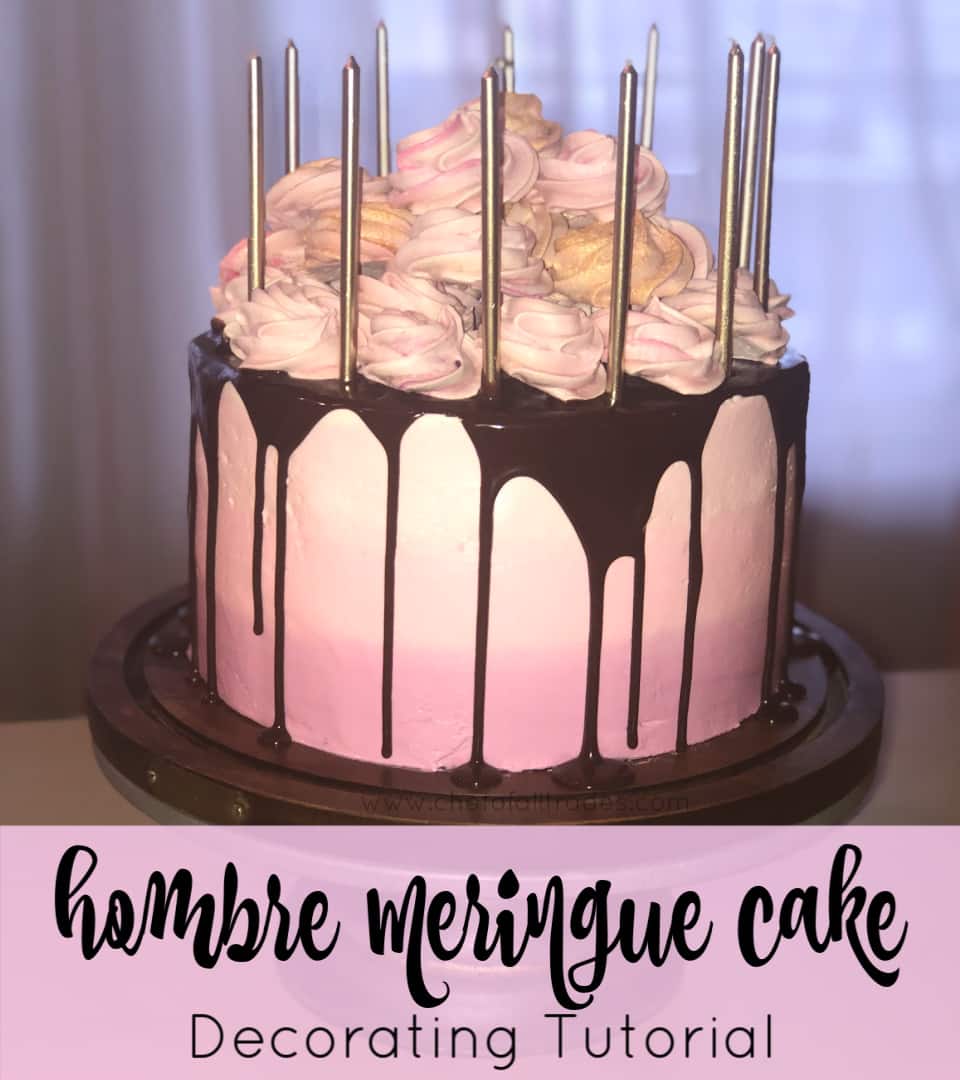
I made this cake for a birthday party for one of my very best friends, Rikki. She is the redhead in the pictures on my “about me” page. Her hair is as sassy as she is and she definitely deserved a fabulous cake because she is one of the most fabulous people I know.
It’s a chocolate cake, Italian meringue buttercream, vanilla meringue cookies, and chocolate ganache. It was a huge hit and even some people who don’t like cake were digging in!
Hombre Meringue Cake Decorating Tutorial
Tools Needed:
- 2 – 8-inch round cake pans (click here for a link to the pans I use)
- Cake turntable (click here for a link to my favorite cake table)
- Small & Large offset spatulas (click here for a link to my favorite spatulas)
- Piping bags (click here for a link to my favorite piping bags)
- Large star tips (click here for a link to my favorite star tips)
- Candles (click here for a link to the ones I used)
- Gel Food Color (click here for a link to my favorite brand and the color I used)
- 8-inch Cake Boards (click here for a link to the cake boards I used)
- Cake Leveling Tool (click here for a link to my favorite cake leveler)
- Cake Smoothing Tool (click here for a link to my favorite cake smoother)
Food Items Needed:
- 2 – 8-inch Amazing Chocolate Cakes (click here to get to the Chef of All Trades Amazing Chocolate Cake recipe)
- Easy Italian Meringue Buttercream (click here to get the Chef of All Trades Easy Italian Meringue Buttercream recipe)
- Cotton Candy Meringue Cookies (click here to get the Chef of All Trades Cotton Candy Meringue Cookie Recipe)
- Silky Smooth Chocolate Ganache (click here to get the Chef of All Trades Silky Smooth Chocolate Ganache recipe)
Instructions:
1. Gather all of your tools and food items listed above. I like to have all of the elements of the cake made before I begin with the exception of the ganache. That’s a personal preference you can do it in whatever order you choose.
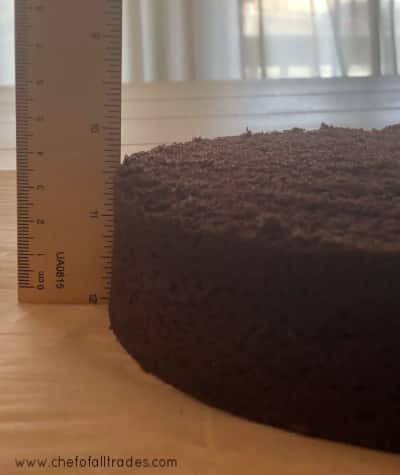
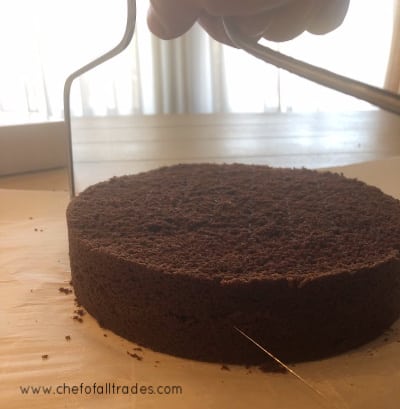
Start by leveling the cake layers. I made 2 8-inch round cakes. I always measure the cakes first to see which is the shortest. If you use the shortest cake as a guide your layers will be even.
In my case, once the cakes were leveled they were about 1 1/2 inches tall. I set my cake leveling wire to 3/4 inch and cut each cake in half making four layers total. 
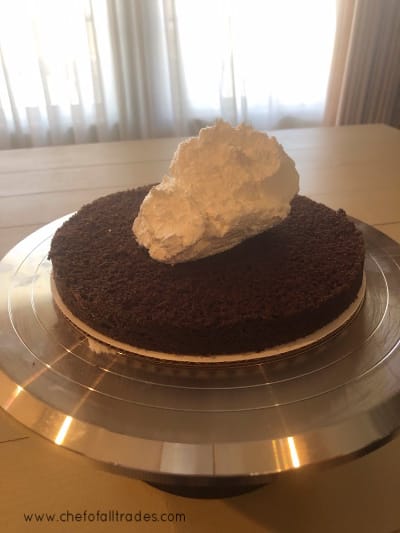
2. For the next step, you will need a 1 recipe of the Italian Meringue Buttercream. Before putting a cake board on the turntable, it is helpful to place a damp paper towel down and put the cake board on top of the paper towel. This prevents the cake board from slipping around while you’re icing the cake. Make sure the paper towel is just damp not soaked.
Place the first layer on the cake board and put a big dollop of buttercream on the layer. Using your mini offset spatula, smooth the buttercream out flat. Make sure it’s flat, these are the steps where we are able to make our cake is straight and structurally sound. Repeat this step until you’ve added all four layers.
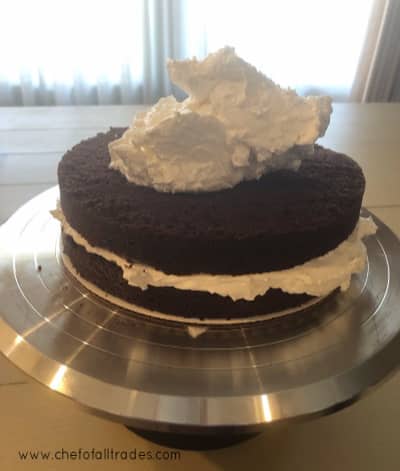
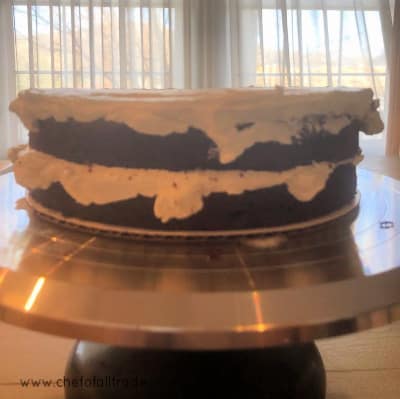
3. At this point, there should be enough buttercream hanging over the edges to crumb coat the cake. Crumb coating is a technique used to seal all the crumbs in the buttercream before a final buttercream layer. It’s a very thin layer and you should be able to see the cake through the buttercream.
To achieve the crumb coat, add a dollop of buttercream to the top and level it out with your offset spatula. I prefer the mini offset but either will work. Then use the icing smoother to spread and smooth the buttercream on the sides of the cake. Once the crumb coat is completed, refrigerate the cake for at least an hour.
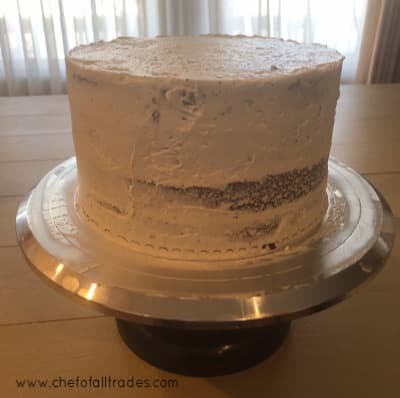
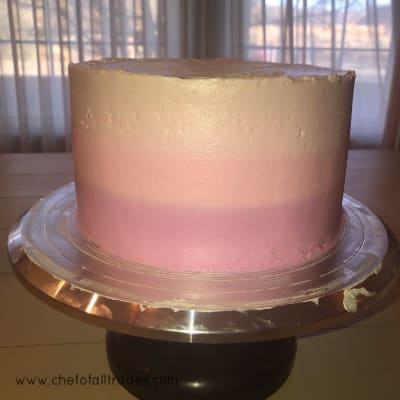
4. Using the 2nd recipe of buttercream, split it into 4 different bowls. choose the color you want your cake to be and add a very small amount of color to one of the bowls. I used Americolor Gel Food coloring in soft pink. Mix it to incorporate the color.
In the second bowl of buttercream add a little more color than the first bowl. Mix to incorporate the color. In the third bowl add a bit more color than the second bowl. Mix to incorporate the color. Leave the 4th bowl white for the top of the cake.

5. Now that the buttercream is colored, put each color into a piping bag. Cut the tip off the piping bag to open it up to about a 1/2 inch hole. Using the darkest color buttercream and starting at the bottom of the cake, pipe buttercream around the bottom of the cake until you reach 1/3 of the way up the cake.
Repeat this step with buttercream from the second bowl which is the one that is one shade lighter than the darkest one until you reach 2/3 up the cake. And again, repeat this step with the lightest color until you reach the top of the cake. Pipe the white buttercream in a spiral on the top of the cake starting in the middle and working your way out to the edge.
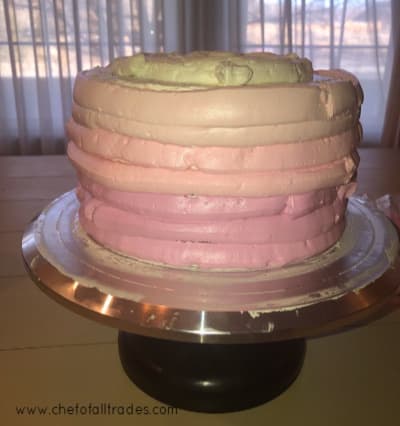
6. Smooth the top out as you did with the layers in step 2. Make sure the top is level. Using the cake smoother, smooth the sides of the cake. Make sure the bottom edge of the smoother is flat on the turntable and hold the smoother at a 45° angle to the cake and begin to turn the turntable to smooth the cake out. If you find you have divots in the buttercream, fill them in with the correct color and resmooth the cake.
At this point, you should have buttercream sticking up over the top of the cake, almost like a crown. Use the mini offset spatula to pull that icing into the center of the top of the cake.
It is important to wipe the spatula off on the edge of a bowl to get rid of the excess buttercream after each time you pull the buttercream into the center of the top of the cake. If you don’t, any excess buttercream will be spread on the side on the cake and you will have to resmooth the sides.
7. Refrigerate the cake for at least 1 hour.
8. Using the large offset spatula, lift one edge of the cake off the turntable to give yourself enough room to get your fingers under the cake. Once your fingers are under the cake, use the large offset spatula to lift the opposite side of the cake to transfer it to the cake stand or serving platter. I used this amazing cake stand from Hearth & Hand by Magnolia.
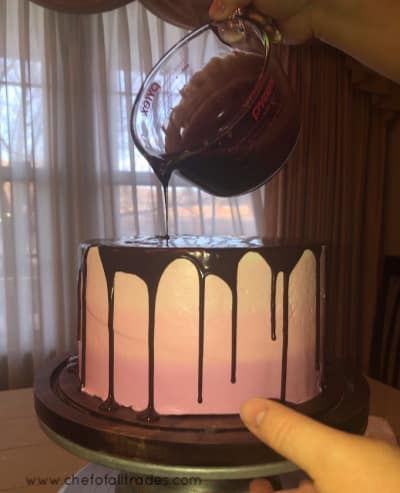
9. Prepare your ganache according to the recipe linked above and transfer to either a glass measuring cup or another cup that has a pour spout. Starting on the outer edge, slowly pour the ganache until it begins to flow over the sides. Once it starts to go over the edge, move on.
If you pour too much in one spot it will start to cover the sides rather then drip down. Don’t forget, you can always add more, you can’t take it off. Continue around the cake until you have a drizzle all the way around, then begin to come to the center making sure the top of the cake is covered.
It’s likely that you won’t use all of the ganache, that’s okay. In the end, you want a covered top and drizzled sides. Allow the ganache to set a bit before you add the meringues to the top.
You can refrigerate to speed the process up but my frig isn’t big enough for a tall cake on the cake stand so I let mine sit out for about 15mins. I used the extra time to clean up. I am a messy baker but, at my husband’s request, I am working on that.
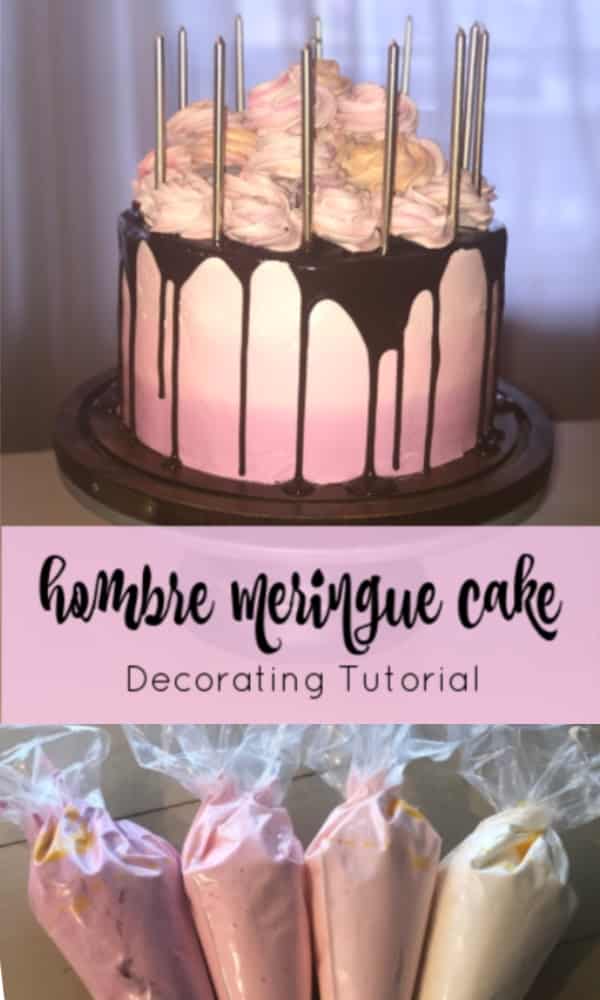
10. Pile the Cotton Candy Meringue Cookies on top of the cake and encircle them with the candles to complete the cake.
Click here for more amazing recipes from Chef of All Trades
Printable Tutorial:
Hombre Meringue Cake
Ingredients
Tools Needed:
- 2 - 8- inch Round Cake Pans
- Cake turntable
- Small & Large Offset Spatulas
- 16- inch Piping Bags
- Large Star Tips
- Candles
- Gel Food Color
- 8- inch Cake Boards
- Cake Leveling Tool
- Cake Smoothing Tool
Food Items Needed:
- 2 - 8- inch Amazing Chocolate Cakes
- Easy Italian Meringue Buttercream doubled
- Cotton Candy Meringue Cookies
- Silky Smooth Chocolate Ganache
Instructions
Instructions:
- Gather all of your tools and food items listed above. I like to have all of the elements of the cake made before I begin with the exception of the ganache. That's a personal preference you can do it in whatever order you choose. Start by leveling the cake layers. I made 2 8-inch round cakes. I always measure the cakes first to see which is the shortest. If you use the shortest cake as a guide, your layers will be even. In my case, once the cakes were leveled they were about 1 1/2 inches tall. I set my cake leveling wire to 3/4 inch and cut each cake in half making four layers total.
- For the next step, you will need a 1 recipe of the Italian Meringue Buttercream. Before putting a cake board on the turntable, it is helpful to place a damp paper towel down and put the cake board on top of the paper towel. This prevents the cake board from slipping around while you're icing the cake. Make sure the paper towel is just damp not soaked. Place the first layer on the cake board and put a big dollop of buttercream on the layer. Using your mini offset spatula, smooth the buttercream out flat. Make sure it's flat, these are the steps where we are able to make our cake is straight and structurally sound. Repeat this step until you've added all four layers.
- At this point, there should be enough buttercream hanging over the edges to crumb coat the cake. Crumb coating is a technique used to seal all the crumbs in the buttercream before a final buttercream layer. It's a very thin layer and you should be able to see the cake through the buttercream. To achieve the crumb coat, add a dollop of buttercream to the top and level it out with your offset spatula. I prefer the mini offset but either will work. Then use the icing smoother to spread and smooth the buttercream on the sides of the cake. Once the crumb coat is completed, refrigerate the cake for at least an hour.
- Using the 2nd recipe of buttercream, split it into four different bowls. choose the color you want your cake to be and add a very small amount of color to one of the bowls. I used Americolor Gel Food coloring in soft pink. Mix it to incorporate the color. In the second bowl of buttercream add a little more color than the first bowl. Mix to incorporate the color. In the third bowl add a bit more color than the second bowl. Mix to incorporate the color. Leave the 4th bowl white for the top of the cake.
- Now that the buttercream is colored, put each color into a piping bag. Cut the tip off the piping bag to open it up to about a 1/2 inch hole. Using the darkest color buttercream and starting at the bottom of the cake, pipe buttercream around the bottom of the cake until you reach 1/3 of the way up the cake. Repeat this step with buttercream from the second bowl which is the one that is one shade lighter than the darkest one until you reach 2/3 up the cake. And again, repeat this step with the lightest color until you reach the top of the cake. Pipe the white buttercream in a spiral on the top of the cake starting in the middle and working your way out to the edge.
- Smooth the top out as you did with the layers in step 2. Make sure the top is level. Using the cake smoother, smooth the sides of the cake. Make sure the bottom edge of the smoother is flat on the turntable and hold the smoother at a 45° angle to the cake and begin to turn the turntable to smooth the cake out. If you find you have divots in the buttercream, fill them in with the correct color and re-smooth the cake. At this point, you should have buttercream sticking up over the top of the cake, almost like a crown. Use the mini offset spatula to pull that icing into the center of the top of the cake. It is important to wipe the spatula off on the edge of a bowl to get rid of the excess buttercream after each time you pull the buttercream into the center of the top of the cake. If you don't, any excess buttercream will be spread on the side on the cake and you will have to re-smooth the sides.
- Refrigerate the cake for at least 1 hour.
- Using the large offset spatula, lift one edge of the cake off the turntable to give yourself enough room to get your fingers under the cake. Once your fingers are under the cake, use the large offset spatula to lift the opposite side of the cake to transfer it to the cake stand or serving platter. I used this amazing cake stand from Hearth & Hand by Magnolia.
- Prepare your ganache according to the recipe linked above and transfer to either a glass measuring cup or another cup that has a pour spout. Starting on the outer edge, slowly pour the ganache until it begins to flow over the sides. Once it starts to go over the edge, move on. If you pour too much in one spot it will start to cover the sides rather then drip down. Don't forget, you can always add more, you can't take it off. Continue around the cake until you have a drizzle all the way around, then begin to come to the center making sure the top of the cake is covered. It's likely that you won't use all of the ganache, that's okay. In the end, you want a covered top and drizzled sides. Allow the ganache to set a bit before you add the meringues to the top. You can refrigerate to speed the process up but my frig isn't big enough for a tall cake on the cake stand so I let mine sit out for about 15mins. I used the extra time to clean up. I am a messy baker but, at my husband's request, I am working on that.
- Pile the Cotton Candy Meringue Cookies on top of the cake and encircle them with the candles to complete the cake.
Leave a Reply